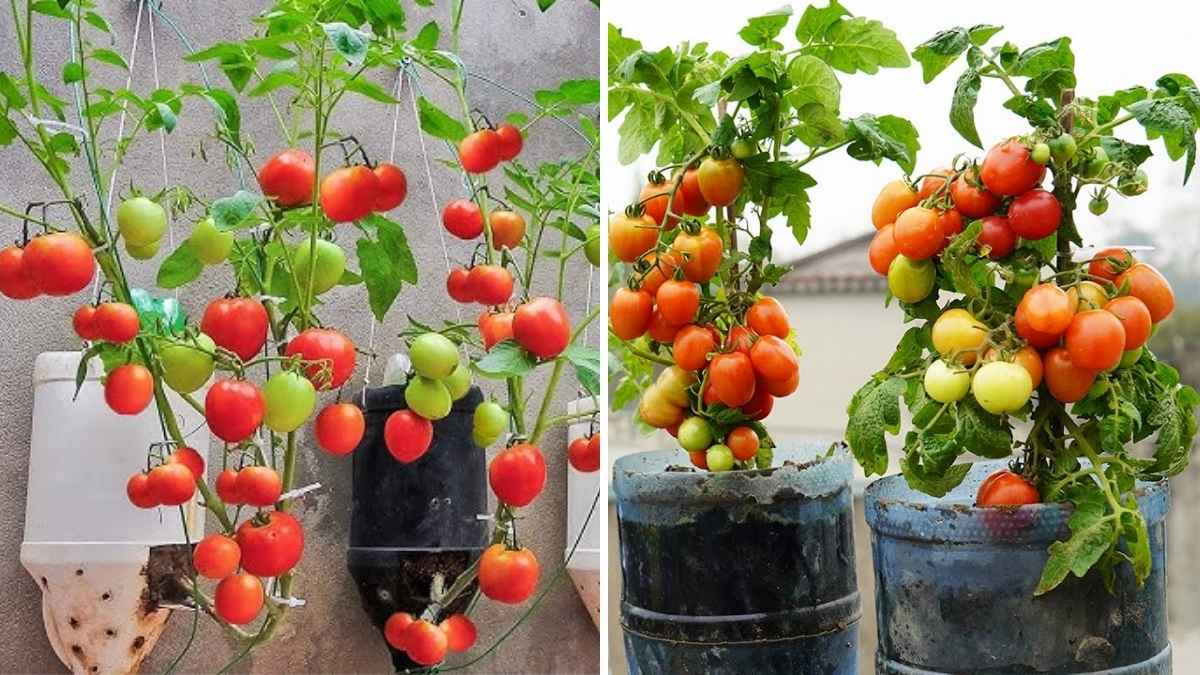
If you love gardening but don’t have enough space for a traditional garden, don’t worry you can still grow plenty of fresh cherry tomatoes using plastic bottles. This simple, eco-friendly method is not only a great way to recycle waste but also lets you enjoy the pleasure of harvesting homegrown produce from your balcony, terrace, or even window sill. With a bit of patience and creativity, you can build your own vertical tomato garden that yields a generous harvest all year round.
Understanding the Concept of Bottle Gardening
Bottle gardening is an innovative technique that makes use of discarded plastic bottles to grow plants vertically. It’s a sustainable solution for people living in urban areas where outdoor space is limited. Instead of throwing away plastic bottles, you turn them into mini planters.
Cherry tomatoes are ideal for this method because they:
- Have compact roots that fit comfortably in small containers
- Produce continuous clusters of fruit throughout the season
- Require minimal maintenance
- Grow well in controlled environments
By using plastic bottles, you reduce plastic waste, save space, and enjoy a productive, attractive green corner in your home.
Selecting the Right Bottles

The first step is choosing the right type and size of plastic bottles. Large bottles give roots more space to grow and retain moisture for longer.
Best choices include:
- Two-liter soda bottles for single tomato plants
- Five-liter water bottles for larger setups or double plants
- Colored or painted bottles to protect roots from sunlight and prevent algae growth
Preparation steps:
- Wash bottles thoroughly with warm soapy water to remove residues
- Peel off labels for a cleaner look
- If using transparent bottles, wrap them with paper, cloth, or paint to block light
This small effort helps maintain a healthier environment for your plants and adds a decorative touch to your vertical garden.
Preparing the Bottles for Planting
After selecting bottles, you need to convert them into planters. The design depends on how you plan to set up your vertical garden whether hanging, wall-mounted, or freestanding.
Here’s how to prepare them:
- Cut each bottle horizontally about one-third from the top
- Make four to five small holes at the bottom for drainage
- If hanging, make two holes near the cut edge and thread a sturdy rope or wire through them
- You can also invert the top portion into the bottom half to create a self-watering system
Drainage is very important because excess water can rot the roots. Proper airflow and drainage will help your tomato plants grow stronger and healthier.
Creating a Nutrient-Rich Potting Mix
Tomatoes are heavy feeders that need nutrient-rich soil to thrive. A good potting mix will ensure healthy growth, proper aeration, and good drainage.
Make your mix using the following ingredients:

- 1 part garden soil or topsoil
- 1 part organic compost or well-rotted manure
- 1 part coco peat or peat moss for moisture retention
- A handful of sand or perlite for better drainage
Additional tips:
- Add a spoon of bone meal or neem cake powder for extra nutrients
- Mix all ingredients thoroughly until the texture is soft and airy
- Avoid using clay-heavy soil as it compacts and restricts root movement
Once the mix is ready, fill each bottle up to three-quarters full, leaving space for watering and root expansion.
Selecting and Planting Cherry Tomato Seeds
You can start from either seeds or small seedlings.
If starting from seeds:
- Use a small seed tray or disposable cups filled with moist soil mix
- Sprinkle seeds evenly and cover them with a thin layer of soil
- Keep them in a warm, shaded area for 5–10 days until germination
- Mist them lightly with water every day to keep the soil moist
When seedlings grow 4–6 inches tall and have at least four leaves, they’re ready for transplanting.
Transplanting steps:
- Gently remove the seedling from the tray without damaging roots
- Plant one seedling in the center of each prepared bottle
- Firm the soil around it and water lightly
Place the bottles in a location where they can receive sunlight for at least six hours daily.
Setting Up Your Vertical Garden
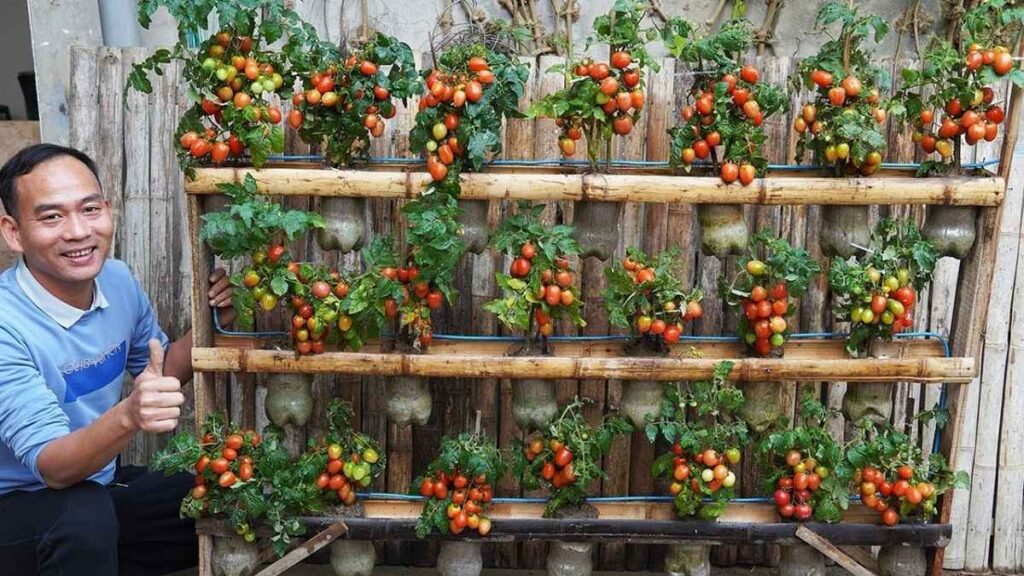
Now it’s time to arrange your bottles into a vertical setup. This is where creativity meets functionality.
Here are a few ideas:
- Hanging wall garden: Suspend bottles with ropes on a metal or wooden frame attached to a wall.
- Stacked frame garden: Arrange bottles on multiple shelves or a stand to form layers.
- Fence-mounted garden: Attach bottles directly to your balcony railing or backyard fence.
Setup tips:
- Keep enough space between bottles for airflow and sunlight penetration
- Position them facing south or east for maximum sunlight
- Ensure the structure is stable and strong enough to hold the weight of soil and plants
A well-designed vertical garden not only looks beautiful but also makes watering and harvesting much easier.
Watering and Maintenance Routine
Because bottles have limited soil volume, water tends to evaporate faster. Maintaining proper moisture levels is essential for healthy cherry tomato growth.

Watering tips:
- Check the soil daily with your finger; if it feels dry, water immediately
- Use a watering can or small hose with a gentle flow to avoid soil displacement
- In hot climates, water twice a day morning and evening
- Add a thin layer of mulch (dry leaves, coco husk, or straw) to retain moisture
Avoid overwatering since stagnant water can lead to fungal growth or root rot. Consistency is key moist, not soggy, soil ensures steady growth and fruit production.
Fertilizing and Supporting the Plants
Cherry tomatoes grow fast and need nutrients at every stage. Regular feeding will enhance flowering and fruiting.
Organic fertilizer options include:
- Compost tea: Mix compost with water and let it sit for a day before watering plants
- Banana peel fertilizer: Provides potassium for fruit development
- Liquid seaweed extract: Strengthens roots and promotes better yield
Feed your plants every two weeks during the growing period.
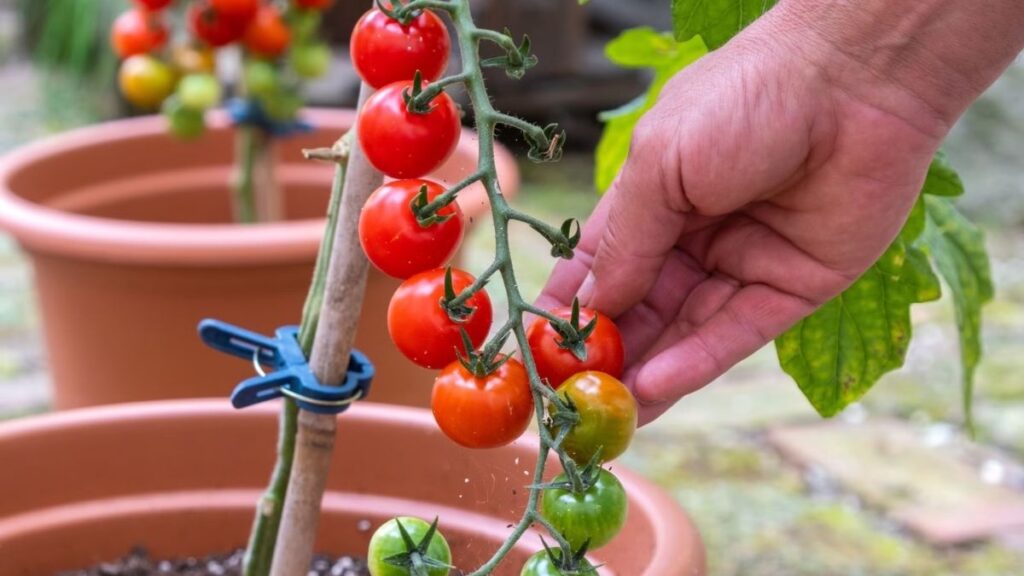
As plants grow taller, they’ll need support to stay upright. You can use:
- Bamboo sticks or wooden stakes inserted into the soil
- Twine or wire loops tied gently around stems
- Small trellis or mesh for climbing support
Proper support keeps the plant stable and prevents the stems from breaking under the weight of fruits.
Pruning and Pest Management
Pruning keeps the plant tidy and encourages fruit production instead of excessive foliage.
Pruning tips:
- Remove suckers small shoots growing between the main stem and branches
- Trim off yellow or dry leaves regularly
- Keep only two to three main stems for better fruit yield
For pest control, check your plants daily. Common pests include aphids, whiteflies, and caterpillars. To keep them away:
- Spray a homemade neem oil solution (1 tsp neem oil + a few drops of liquid soap in 1 liter of water)
- Introduce natural predators like ladybugs if possible
- Avoid chemical pesticides that can harm the environment
Healthy plants with proper care and sunlight rarely face serious pest problems.
Pollination and Fruit Development
Cherry tomatoes are self-pollinating, but light vibration or assistance improves yield.
To encourage pollination:

- Gently shake the plant or tap flowers to distribute pollen
- Use a small brush or cotton swab to manually pollinate if indoors
- Keep the area well-ventilated to allow air movement
Once pollinated, small green tomatoes begin to form within a few weeks. Continue watering and feeding as fruits grow. Gradually, they’ll turn red, orange, or yellow depending on the variety you planted.
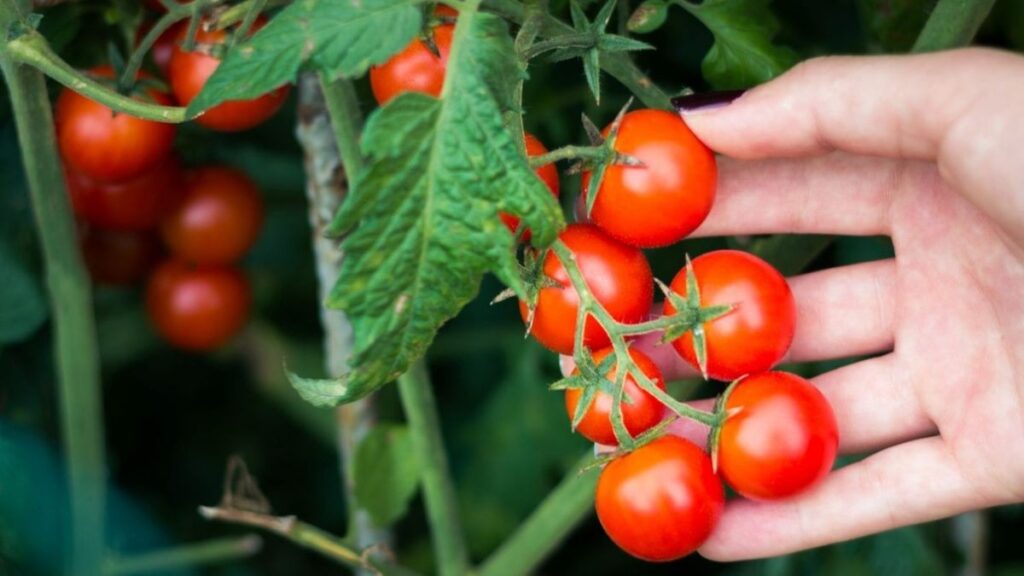
Harvesting Cherry Tomatoes

Your patience pays off when you see clusters of ripened cherry tomatoes hanging from your vertical garden.
Harvesting guide:
- Pick tomatoes when they are fully colored and slightly firm
- Use scissors or gently twist them off to avoid damaging branches
- Harvest regularly to promote continuous fruiting
Fresh cherry tomatoes can last for several days at room temperature. For longer storage, keep them in a cool, dry place away from direct sunlight.
Expanding and Reusing Your Garden
Once your plants complete their life cycle, you can reuse the bottles for another round of planting. Simply:
- Remove old soil and clean the bottles thoroughly
- Replace with a fresh potting mix and compost
- Rotate crops try herbs like basil or mint after tomatoes
You can also expand your setup by adding more bottles or combining different crops for a mixed vertical garden.
Good companion plants for cherry tomatoes include:
- Basil (improves flavor and repels pests)
- Marigold (keeps harmful insects away)
- Lettuce or spinach (thrives in partial shade below tomatoes)
Final Thoughts
Growing cherry tomatoes in plastic bottles is more than a gardening activity it’s a sustainable lifestyle choice. This creative vertical garden project transforms waste into a source of fresh, organic food while adding a touch of greenery to your home. It teaches patience, care, and the joy of watching something grow under your hands.
With regular watering, sunlight, and organic care, your mini vertical garden can supply a steady harvest of sweet, juicy cherry tomatoes that are perfect for salads, sauces, and snacks.
You don’t need a large garden or expensive tools just a few bottles, some seeds, and your passion for plants. Start small, stay consistent, and soon your wall of bottles will burst with colors of ripe tomatoes, proving that even the tiniest spaces can yield beautiful results.